
Getting Started with Scrumpy
Updated
This guide walks you through setting up Scrumpy for your team.
Step 1: Install the App
Scrumpy is installed from the Atlassian Marketplace. After installation, it appears as a panel on Jira work item pages and adds a settings page for your space.
Step 2: Configure Your Team
Open Space settings > Scrumpy Poker > Permissions and assign roles to your team:
- Moderators: people who start, manage, and complete voting sessions. Typically scrum masters, team leads, or product managers.
- Voters: team members who cast estimates during voting sessions.
- Guests: anyone who is not a moderator or a voter. Guests can watch sessions and see results, but they cannot vote or moderate.
By default, everyone with access to the space is a guest. You must give voting or moderating access explicitly. Moderators cannot vote by default; to let a moderator vote, add that person to the voters list as well.
You can also reset the space's permissions, password, and configured Confluence space to defaults from this page. A confirmation appears first, and the reset cannot be undone. Perspective settings are reset individually from each perspective's General tab.
Choose Where Scrumpy Appears
The same page controls where Scrumpy appears in Jira. Two checkboxes are selected by default:
- Show the Estimations page adds the Estimations tab to the space navigation. Clearing it hides the page for everyone in the space. It also hides the Add to planning action on work items, because planning sessions live on that page.
- Show the Scrumpy panel on work items adds the Scrumpy panel to the right of every work item. Clearing it hides the panel for everyone in the space. The estimation log stays available until both the panel and the page are hidden.
Your choice applies to everyone in the space, not only to you, and it takes effect the next time Jira loads the space or a work item. These checkboxes hide surfaces in Jira. They do not delete estimates, planning sessions, or estimation history, and they do not replace Jira permissions. Reset to defaults does not change them.
Optional: Set a Password
You can protect a space with a password. When a password is set, anyone opening the Scrumpy panel, the Space Estimations page, the estimation log, or the add-to-planning action must enter it first. Live updates for voting, chat, and planning are locked too: without the password, a visitor does not receive them. Live updates also require that you can browse the space in Jira, with or without a password. Space settings stay available to people who can manage the space in Jira. Passwords must be at least 8 characters. Scrumpy checks the password after you pause typing, and it never sends an entry shorter than eight characters, so a partial password does not spend an attempt. The length rule is enforced by the server, and the password is stored as a slow salted hash that cannot be read back or reused to sign in without the password. You can change or remove the password at any time.
After five incorrect attempts in fifteen minutes, the account is locked out for fifteen minutes and the password field is disabled until the lockout ends. A successful entry clears the failed-attempt count.
After you enter the password once, Scrumpy remembers it for your account for 30 days. The same entry unlocks every Scrumpy surface, so you are not asked again. The remembered entry expires after 30 days, and it is cleared when the password is changed or removed, at which point you enter it again.
Step 3: Set Up Perspectives
Perspectives define how your team estimates. Each perspective has its own voting rules, card sequences, and target Jira field.
Open Space settings > Scrumpy Poker > Settings to choose the space's working week and configure your perspectives. A Default perspective is created for you automatically, set up for Story Points estimation, and it cannot be deleted.
Step 4: Start Estimating
Open any Jira work item and look for the Scrumpy panel on the right side of the screen.
- As a moderator, click Start to begin a voting session
- As a voter, cast your estimate by clicking a card
- Once all required voters have submitted, the moderator accepts the result
Step 5: Use the Space Estimations Page
Open Space > Estimations. The page has these tabs: Getting started, Tutorials, Refinement/grooming, Capacity planning, Standup, Retrospective, Voting sessions, Dashboard, and a right-aligned Feedback tab. A support icon to the right of Feedback shows or hides the quick start guide. If a password is set, the whole page is locked until you enter it. Space settings are not locked by this password; they follow the Jira permissions for the space. The tab you last opened is remembered for the current browser tab, so a reload returns you to it. If the connection to Jira drops for a moment, the page catches up when it returns, so a voting session that was started, paused, accepted, or cancelled in the meantime shows its current state without a reload.
Getting Started
An onboarding walkthrough that explains what estimation is and how to use Scrumpy. Most sections include screenshots. They follow your Jira theme, and their captions follow your language. The Chat section shows examples for sending a message, reactions, and private messages.
Tutorials
Short guided tours with screenshots. Choose a tutorial in the Select tutorial dropdown at the top center of the tab and read it right away. The tutorial loads when you select it. Each tutorial is a few short steps with a screenshot for every step, so you can follow along without leaving the page. Screenshots follow your Jira theme, so you see the light or dark version that matches the theme you use. Your choice is remembered for the current browser tab. Tutorial text follows your Jira language. Screenshots stay in English and follow your Jira theme.
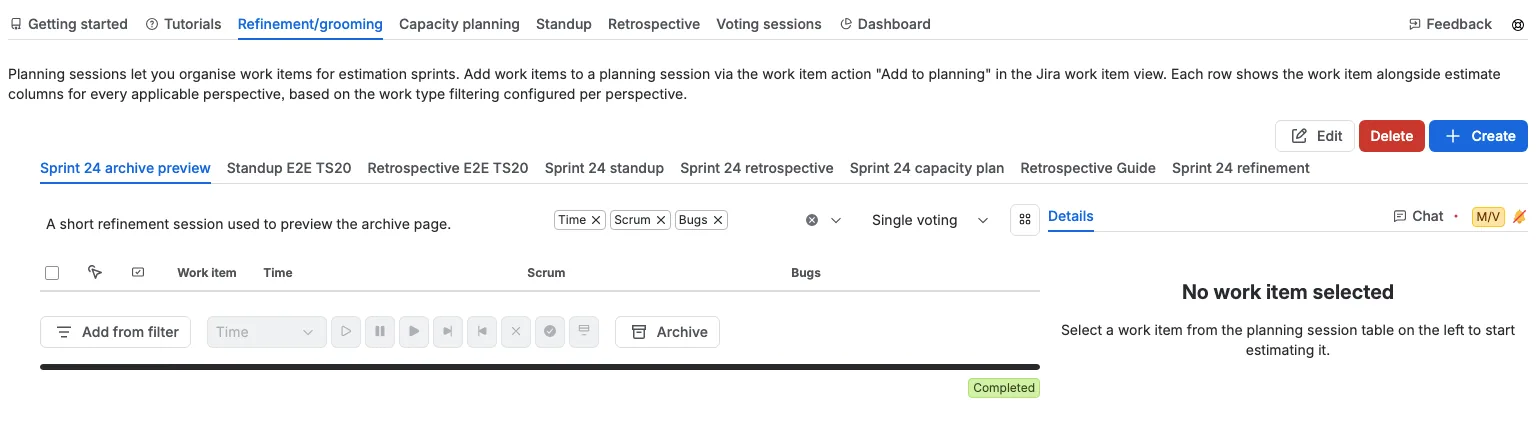
Refinement/grooming
Create and manage planning sessions to organize refinement work. See the Planning sessions page for details.
Capacity planning
Plan how much work your team can take on in the next sprints. Open the tab, choose a planning session, and select Plan sprint to add the closed sprints that set your velocity and the active or future sprints you want to plan. The combined table shows each sprint together with its work items, the target capacity, and a colored timeline, so you can see at a glance whether the plan fits.
Use the right side to set each team member's utilization and working hours, edit the selected sprint, vote on a work item in its perspective tab, or chat about it. Moderators can rank the work items, apply the plan to Jira, and archive the sprint to Confluence. See the Capacity planning page for the full walkthrough.
Standup
Run a standup for a planning session. Choose the board and sprint, then review the work items in their board columns. The moderator marks the item the team is discussing, can limit how many cards each column shows, and controls the shared countdown. Flag work items and stage status moves, then apply them to Jira. See the Standup page for the full walkthrough.
Retrospective
Run a sprint retrospective for a planning session. Add notes in the three columns, like and group the notes you agree on, and turn them into action items. The moderator moves the retrospective through Feedback, Vote, and Actions and controls the shared countdown. Archive the results or delete the planning session when you are done. See the Sprint retrospectives page for the full walkthrough.
Voting Sessions
A sortable table of every voting session in the space. Click a column header to sort by type, work item, start time, ending time, perspective, state, or completion. The table shows 25 rows at a time; use the controls below it to move between pages.
- Type and Work item: centered headers and cells. Work item cells have no leading space before the key.
- State and % complete: left aligned, minimum width, and the % complete header stays on one line.
- Voters: right aligned.
- Started: how long ago the session began. The value updates every 10 seconds, for example 5m 10s, 5m 20s, and 5m 30s. This column keeps 20% of the table width, so the changing timer does not resize the table.
- Ending: counts down the remaining time. It updates every 10 seconds, then every second during the last 10 seconds. This column keeps 15% of the table width for the same reason.
- Completion: shows a status tag.
Each row also lists the session's voters by name in small text. Click an issue key to open the work item, where the Scrumpy panel has the voting controls. Only sessions for work items you can open in Jira are listed; a work item hidden from you by Jira issue-level security is omitted. When there are no sessions, the tab shows an empty state instead of the table. If you already viewed sessions on another tab, they appear right away, and the rest of the space's sessions load in the background without a loading placeholder.
Moderators can act on several sessions at once: tick the sessions (or use the header checkbox to select all), then use the buttons below the table.
- Pause pauses the selected active sessions. Sessions in perspectives with asynchronous voting are skipped.
- Resume resumes the selected paused sessions. Sessions in perspectives with asynchronous voting are skipped.
- Complete finishes a session that has real votes and cancels one whose votes are missing or are only extra emoji cards.
- Restart starts a new round for the selected completed sessions right away, with the configured required voters. The completed result and its votes are discarded, and the work item keeps its place in the perspective's rankings.
- Cancel stops the selected sessions, including completed ones.
- Accept writes the completed sessions' estimates to Jira.
You do not choose a perspective because each row already names its own. If a write fails, an error dialog reports the affected work items. The buttons stay disabled until the selection contains a session in a matching state; Pause needs an active session, Resume needs a paused session, and both need a perspective without asynchronous voting. Restart needs a completed session. Cancel is enabled for any selected session, started or completed.
On the right of the action row, the avatars show everyone who has voted in any of the listed sessions. Everyone sees this group, and it keeps its place before anyone has voted so the action row does not move when the first voter appears. The action buttons are moderator-only.
A bulk action changes the table right away: the row shows its new state or disappears, and the buttons enable or disable from the updated rows, so you cannot run the same action twice. There is no spinner, and if the change cannot be saved the previous rows return.
Dashboard
Three charts summarize current activity: active sessions by perspective, unique voters by perspective, and sessions by state per perspective. Below the charts, avatars show everyone who has voted, and the row appears once the first person votes. Sessions you already viewed on another tab appear right away, and the charts update as the rest of the space's sessions load in the background.
Feedback
The right-aligned Feedback tab lets you rate the app, suggest improvements, and contact the support team. See the Feedback and Support section for details.
Quick start guide
Above the tab list, a Quick start guide shows four steps to get going:
- Set up the space moderators and voters (open the space settings Permissions tab to do this).
- Create a planning session with an optional start and end time using Create.
- Add Jira work items to the refinement/grooming tab from an existing Jira filter.
- Arrange the items in the order they will be estimated.
The guide is for new spaces, so it disappears on its own once you add work items to refinement/grooming, save a plan on the capacity planning tab, or write a note in a retrospective. Choose Dismiss in the message to hide it, or use the support icon in the tab bar to show it again.
Adding Work items to Planning from the Work item View
When you view a Jira work item, open the Scrumpy panel and click Add to planning to add the current work item to an existing planning session, or create a new one on the spot. Only moderators can add work items; everyone else sees a note explaining this. The panel remembers the planning session you used last on the space.
Filtering Work items with JQL
For advanced users who build Jira filters and boards, Scrumpy provides a custom JQL function, issuesInEstimation(), that returns the work items currently being estimated.
Parameters
| Parameter | Required | Description |
|---|---|---|
projectKey | Yes | The Jira space key (for example "PROJ") |
state | No | Filter by session state. Only "paused" and "completed" are recognized. Omit to include every state |
perspectives | No | Filter by one or more perspective names, separated by commas (for example "Points, Time"). Names must match exactly, including case |
Values after projectKey are read by value: "paused" and "completed" select the state, and any other value is treated as a comma-separated list of perspective names.
The function supports both in and not in JQL operators. It only returns work items the current user is allowed to see, so a shared filter shows each viewer the work items they can access.
Examples
issuekey in issuesInEstimation("PROJ")
Return all work items in space PROJ that have an estimation session in any state. This is the most common usage, for a board that shows the work items being estimated.
issuekey in issuesInEstimation("PROJ", "paused")
Return work items in PROJ with a paused voting session. Useful for finding work items that need the moderator's attention.
issuekey in issuesInEstimation("PROJ", "completed")
Return work items in PROJ where voting has completed but the moderator has not accepted the result yet.
issuekey in issuesInEstimation("PROJ", "paused", "Points")
Return work items in PROJ with a paused session in the Points perspective. You can list several perspective names to match any of them.
issuekey not in issuesInEstimation("PROJ", "completed")
Return work items in PROJ that are not in a completed estimation session. Use not in to exclude work items from a filter or board.